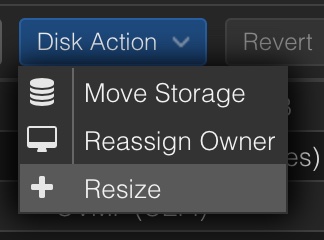
Step one is to update the disk size for the VM. This is easily done in the GUI. Select your VM on the left, click on “Hardware,” choose the virtual disk you want to resize, and then select the “Disk Action” menu from the top. From here select “Resize” as per the below:
This should bring up the dialog where you can increase the size of the drive. If you have a 500G drive and want to increase it to 1000G, then type “500” in this dialog box. When finished click the “Resize disk” button.
Next, within the VM you need to increase the partition size. You can check the current size with sudo fdisk -l Mine looked like this:
/dev/vda3 6397952 1048573951 1042176000 496.9G Linux filesystemTo resize the actual partition use growpart /dev/vda 3. Note that there is a space between the device and the partition number when using growpart. Using pvdisplay should show the correct space now. You may need to use pvresize /dev/vda3 if not. Mine looked like this:
  --- Physical volume ---
  PV Name               /dev/vda3
  VG Name               ubuntu-vg
  PV Size               <996.95 GiB / not usable 2.98 MiB
  Allocatable           yes
  PE Size               4.00 MiB
  Total PE              255218
  Free PE               128000
  Allocated PE          127218
  PV UUID
Next use lvdisplay to check the size of the LV. In my case it was LV Size <496.95 GiB using the lvextend -l +100%FREE /dev/ubuntu-vg/ubuntu-lv command will extend this size. Note that the last argument will be listed under “LV Path” with the lvdisplay command. Another lvdisplay should show that the LV Size <996.95 GiB. df -h will still show the old size so lastly we will run resize2fs /dev/ubuntu-vg/ubuntu-lv to resize the FS. Rerunning df -h should now show that the filesystem is the correct size.
Profit!